5 - Recommended Environment
Table of Contents
Tutorial Part 5 - JDK and Recommended Environment
Now that we have a working Eclipse and MCP workspace, we could dive straight in and start coding our mods. However there are two topics which are still useful to cover before we do so. If you are reading this tutorial to get started as quickly as possible, you can skip these steps if you wish but I strongly recommend you read at least the first point. The information covered in this step will save you a lot of time and pain later on.
Your JDK Version
If you installed Java from the Oracle site then chances are you installed the most up-to-date version, which at time of writing is Java 8 (or 1.8.x_xx), for Minecraft development however this is not the best version to use. If you are not sure what versions of Java you have installed, you can find out by doing the following:
- Open Control Panel.
- Click the “Java” icon to open the Java Control Panel.
- Click the “Java” tab and then click “View…” to open the JRE Settings Panel.
- You should see the installed platforms listed, if you see an entry with “Platform” listed as “1.6” you have everything you need to continue. Make a note of the “Location” next to the 1.6 platform, you will need it later.
The reason that we want Java 6 is that Java 7 is still not fully ubiquitous “in the wild”, there are still a lot of systems running Java 6 and compiling your mod with Java 7 or 8 can lead to it not running for some users who don't yet have Java 7. Whether or not they should get Java 8 is not a debate for this tutorial, suffice to know that if you are developing for Minecraft you should use Java 6.
Downloading JDK 6 if you don't have it
You can still download the Java Development Kit from Oracle although you will have to register on the Oracle site to do so, this is relatively painless though and you do not need to wait for the verification email before you can continue to the download.
Selecting JDK 1.6 in Eclipse
Once you have Java 6 set up, you need to tell Eclipse that this is the Java Runtime Environment (JRE) that you'd like to use.
- In Eclipse choose “Window” then “Preferences”.
- Navigate to “Java” then “Installed JREs” in the left pane.
- You should see the existing JRE7 in the right hand pane, marked in bold to indicate that it is the default
- Click the “Add…” button
- Choose “Standard VM” and click “Next”
- Click the “Directory…” button next to the JRE home box and navigate to the JRE folder, which is normally
- C:\Program Files\Java\jdk1.6.0_xx
(Where the “xx” is the revision number of the 1.6 JDK. You may also use a “jre6” installation if you have one.)
- Click “OK” and the window should populate with information about the JDK installation, change the “JRE Name” to jre6
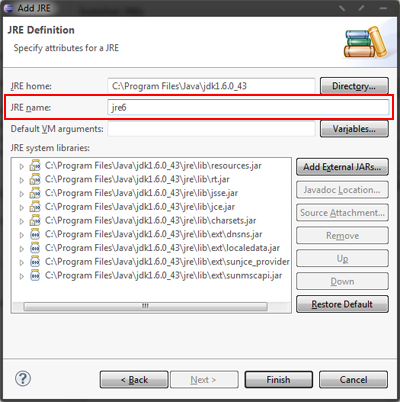
- Click “Finish” to close the dialog
- In the Installed JREs dialog click the checkbox next to jre6 to make it the default JRE.
- Click the “OK” button to close the Preferences window and save the changes.
Eclipse is now configured to use Java 6, you can optionally skip the next part and move to the next section of the tutorial if you wish.
Recommended Environment for Eclipse
Eclipse is an incredibly powerful tool, however “out of the box” some of the settings are not ideal and some optional warnings and errors which help immensely are turned off by default. In this section I will cover which settings you should enable to get the most out of Eclipse when writing your mods.
Excluding the decompiled Source
Before we do that however, we need to exclude the decompiled source from our new settings, otherwise all hell will break loose since there are so many violations of these rules in the decompiled MCP source that we'd be swamped in meaningless errors and warnings before we even started. To do this, we will just tell the project to use its own settings, which it will inherit from the current settings we have now.
- In Eclipse, expand the Package Explorer if it is not already shown and right click on the Client project.
- Click “Properties”.
- In the left pane expand “Java Compiler” then “Errors/Warnings”
- Click the “Enable project specific settings” checkbox at the top of the window
- Click “OK” to accept the settings.
Enabling useful errors and warnings
Now we've frozen the settings for “Client”, we're free to make the global settings more strict.
- Choose “Window” then “Preferences”.
- Expand “Java”, “Compiler” then “Errors/Warnings”.
- The Errors/Warnings dialog is broken down into several sub-sections, change the following values as listed
- Under Potential programming problems
- Change 'switch' case fall-through to Warning
- Under Deprecated and Restricted API
- Change Deprecated API to Warning
- Under Unnecessary code
- Change Unused private member to Warning
- Change Unnecessary cast or 'instanceof' operation to Warning
- Under Generic types
- Change Unchecked generic type operation to Warning
- Change Usage of a raw type to Warning
- Under Annotations
- Change Missing '@Override' annotation to Error
- Change Missing '@Deprecated' annotation to Warning
- Click “OK” and click “Yes” when prompted whether you want to rebuild the workspace to apply the changes.
Of the above, if you choose to make no other modifications, requiring @Override is by far the most critical. The reason for this being that since all methods in Java are virtual methods, without this annotation some potentially catastrophic programming errors can occur which could easily be spotted at compile-time if this annotation is used.
For example, without using @Override, the following situations can occur
- An API or base-class method which you are overriding could be renamed, removed, or have its signature changed. Without @Override this would not generate an error and you could spend hours wondering why your code doesn't work any more. This is especially relevant when working with Minecraft, because methods change all the time and a method you used to override might not exist or might not have the same name/signature. Using @Override this situation immediately generates a compile error which you must fix, avoiding this problem entirely.
- Overriding a method that you didn't intend to override is another possibility when not using @Override. This can happen where you name a method using standard Java conventions, not realising that you have accidentally hidden a method in a superclass (and thus overridden it if the method is not private) which can cause unexpected behaviour.
Needless to say, it's a bit of a mystery why this option is turned off by default, other than the fact that the Java specification doesn't require it, not even having it set to “Warning” as a default is completely mystifying.
Setting up static imports for OpenGL in Eclipse
Quite often when making mods for Minecraft, you will want to invoke OpenGL functions in your code. As recommended in the LWJGL documentation, using Java's static import feature makes this much more comfortable and familiar if you have used OpenGL before in other languages such as C++. However, static imports are a nuisance because they aren't auto-completed by Eclipse under normal circumstances, however a simple change will allow auto-completion for these static imports and automatic creation of the static import declaration in classes where you use them.
Note, it's best to ignore the decompiled source's use of LWJGL, which uses qualified calls throughout - this is solely due to the decompile process and you can rest assured that this is not representative of the original code and isn't a practice you should emulate in your own code!
Note that the usage of OpenGL has changed in Minecraft 1.8, see below for setting up static imports for Minecraft 1.8 and later
Setting up static imports in 1.7 and before
To turn on the static auto-completion, we need to add candidate classes to the Content Assist Favourites screen:
- Click “Window” then “Preferences”
- In the left pane expand “Java” - “Editor” - “Content Assist” - “Favourites”
- Click the “New type…” button
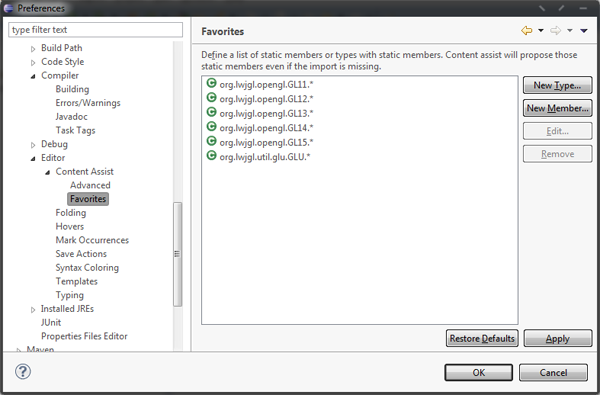
- Add the following types (and any others you want) to the content list
- org.lwjgl.opengl.GL11
- org.lwjgl.opengl.GL12
- org.lwjgl.opengl.GL13
- org.lwjgl.opengl.GL14
- org.lwjgl.opengl.GL15
- org.lwjgl.util.glu.GLU
- Once you have done so the dialog should look like this:
- Next, in the left pane expand the “Code Style” node and then “Organise Imports”.
- At the bottom of the window change the Number of static imports needed for .* option to 1 as shown
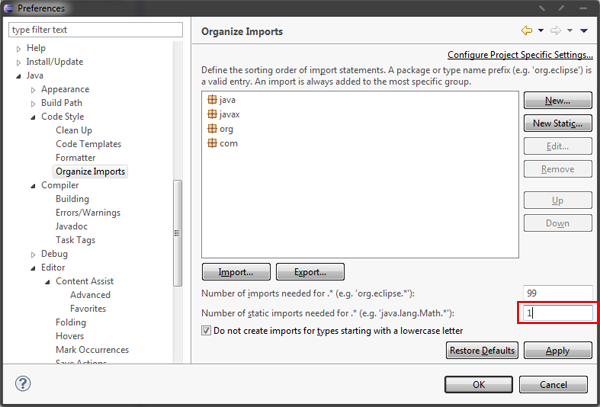
This ensures that the first static import used will import the entire class, which is neater than ending up with dozens of individual method imports
- Click “OK” to close the preferences window
Setting up static imports in 1.8 and later
In 1.8 the procedure is exactly the same as for 1.7, but instead of importing all of the lwjgl namespaces, you need only import a single convenience class provided by LiteLoader:
- com.mumfrey.liteloader.gl.GL
This new class replaces all of the lwjgl calls with calls to Mojang's new GlStateManager class.
Navigation
- Previous Getting the LiteLoader Source


